Christmas Oreo Pops
The soft crunch of chocolate, the creamy filling, and the sparkle of holiday sprinkles make Christmas Oreo Pops a treat everyone looks forward to during the season. These bite-size desserts are simple to prepare and bring instant joy to family gatherings. They combine the rich flavor of Oreos with smooth white chocolate, creating a perfect mix of taste and festivity.
Why You’ll Love This Recipe
Christmas Oreo Pops are easy to make, look beautiful, and taste like a mix of cookies and truffles. They work well for parties, gift boxes, or cozy family nights. You can prepare them quickly with only a few ingredients, and they stay fresh for days. Kids love helping with decorations, and the final result always looks store-bought even though it comes from your own kitchen.
Ingredients
You only need a few simple ingredients to make a full batch of Oreo Pops.
- 1 pack of Oreo cookies (about 36 cookies)
- 8 ounces of cream cheese (softened)
- 1 cup of white chocolate chips or candy melts
- Holiday sprinkles or crushed candy canes for topping
- Lollipop sticks or cake pop sticks
Equipment You’ll Need
- Food processor or rolling pin for crushing cookies
- Large mixing bowl
- Spatula or spoon
- Baking sheet
- Parchment paper
- Microwave-safe bowl
- Styrofoam block or small stand to hold pops while setting
Step-by-Step Instructions
1. Crush the Oreos
Add Oreo cookies to a food processor and grind until fine crumbs form. If you do not have a food processor, place the cookies in a zip bag and crush them with a rolling pin until no large pieces remain.
2. Mix with Cream Cheese
Place the crumbs in a bowl and add softened cream cheese. Mix with a spatula until you get a thick, smooth dough. The mixture should hold its shape when pressed between your fingers.
3. Shape the Pops
Scoop small portions and roll into 1-inch balls. Arrange them on a tray lined with parchment paper.
4. Insert the Sticks
Melt two tablespoons of white chocolate. Dip the tip of each lollipop stick into the melted chocolate, then push it halfway into each Oreo ball. This step keeps the stick in place.
5. Freeze the Pops
Place the tray in the freezer for 15 minutes. This helps the pops stay firm during dipping.
6. Melt the Chocolate
Place the white chocolate chips in a microwave-safe bowl. Heat for 30 seconds, stir, and repeat until smooth. Add a teaspoon of vegetable oil to make it easier to coat.
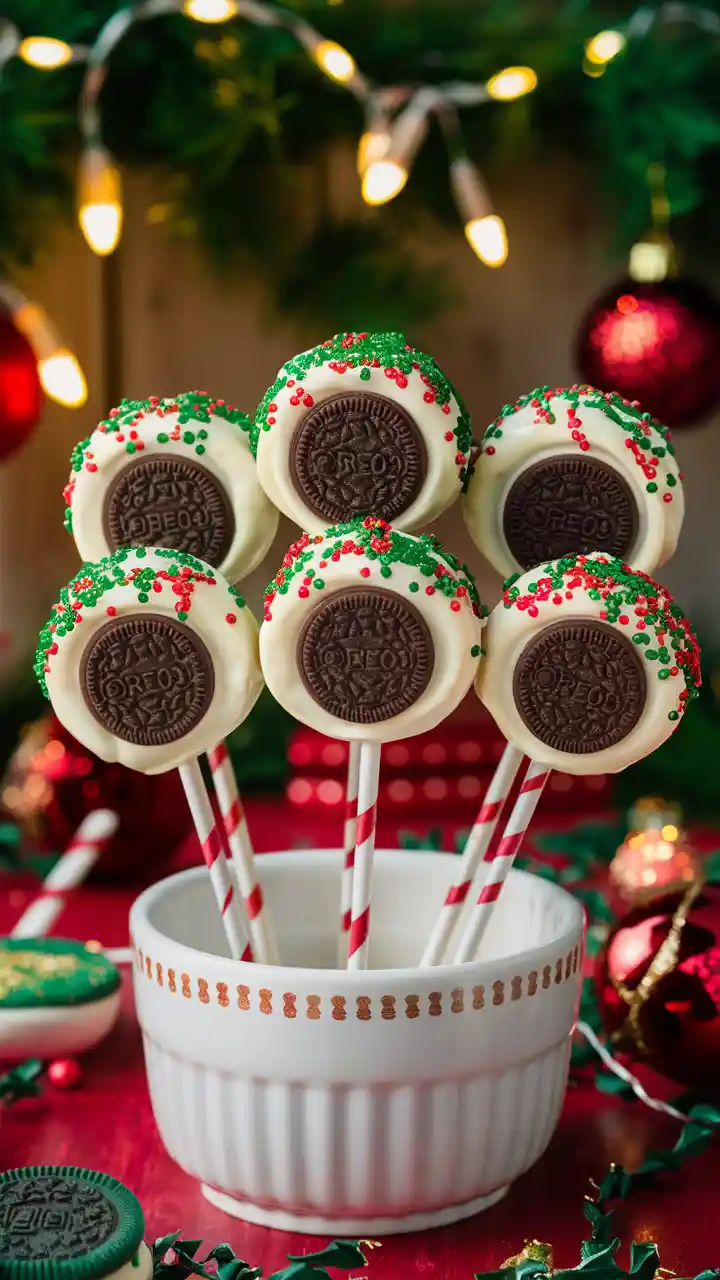
7. Dip and Decorate
Take the chilled pops out of the freezer. Dip each one into melted chocolate until fully coated. Let extra chocolate drip off, then add sprinkles or crushed candy canes right away before the coating sets.
8. Set the Pops
Place the decorated pops upright in a foam block or lay them flat on parchment paper. Chill them in the refrigerator for 10 minutes until the chocolate becomes firm.
Expert Tips for Smooth Results
- Use cream cheese at room temperature for easy mixing.
- Keep your hands cool when rolling the balls to prevent melting.
- Work with small batches so the mixture stays cold.
- If chocolate becomes too thick, reheat it for 10 seconds and stir well.
- For a smooth surface, tap the stick gently on the bowl edge after dipping.
Flavor Variations
You can create different flavors for variety:
- Peppermint Crunch: Add a few drops of peppermint extract to the dough and roll the pops in crushed candy canes.
- Red Velvet: Use red velvet Oreos and drizzle dark chocolate on top.
- Peanut Butter: Mix one spoon of peanut butter with the crushed Oreos for a rich nutty flavor.
- Chocolate Delight: Use milk chocolate for coating and add gold sprinkles for a warm holiday tone.
How to Serve Christmas Oreo Pops
Festive Display
Arrange the pops in glass jars or small vases filled with sugar or decorative beads. Add a few pine leaves or small ornaments around the base for a holiday touch.
Gift Boxes
Wrap each pop in clear plastic, tie with a red ribbon, and place them in a small box with tissue paper. Add a note card for a personal message.
Dessert Table
Combine Oreo pops with cookies, cupcakes, and brownies on a large platter. Use matching colors for all desserts to create a beautiful, coordinated display.
Hot Cocoa Station
Place a small stand of Oreo pops beside your cocoa bar. They pair perfectly with warm drinks and can be dipped into hot chocolate for extra sweetness.
Make-Ahead and Storage
You can make Christmas Oreo Pops in advance without losing freshness.
- Store in an airtight container in the refrigerator for up to 7 days.
- To freeze, place them on a tray until solid, then transfer to a freezer bag.
- Thaw overnight in the fridge before serving.
- Avoid storing at room temperature for long hours to prevent the chocolate coating from melting.
Kid-Friendly Version
Kids can help shape the Oreo balls and add sprinkles. Keep the chocolate dipping for adults since it can be warm. Let the kids decorate after the coating sets slightly so sprinkles stay in place without sliding.
Nutrition Facts (Per Serving)
| Nutrient | Amount (Approx.) |
|---|---|
| Calories | 180 |
| Fat | 9g |
| Carbohydrates | 22g |
| Protein | 2g |
| Sugar | 15g |
Values can change slightly based on ingredients used and coating thickness.
Common Questions
Can I make these without cream cheese?
Yes, you can use mascarpone cheese or a dairy-free cream cheese alternative for a similar texture.
How do I stop the pops from falling off the stick?
Dip the stick in melted chocolate before inserting it into the Oreo ball and chill before coating.
Can I use candy melts instead of chocolate chips?
Yes, candy melts work well and give a smoother, faster-setting coating.
How far ahead can I make them?
Make up to one week in advance and store in the fridge.
Pro Tip
Keep your coated pops in a foam block while chilling to help them set without flat spots. This keeps them round and shiny for serving or gifting.
Final Note
Christmas Oreo Pops bring together taste, color, and the spirit of the holidays. Each bite has the perfect balance of creamy and crunchy textures. Make a batch for your next party or wrap them as edible gifts for friends. Simple steps, cheerful colors, and a little creativity turn these small treats into something special every time.